Thursday, March 14, 2013

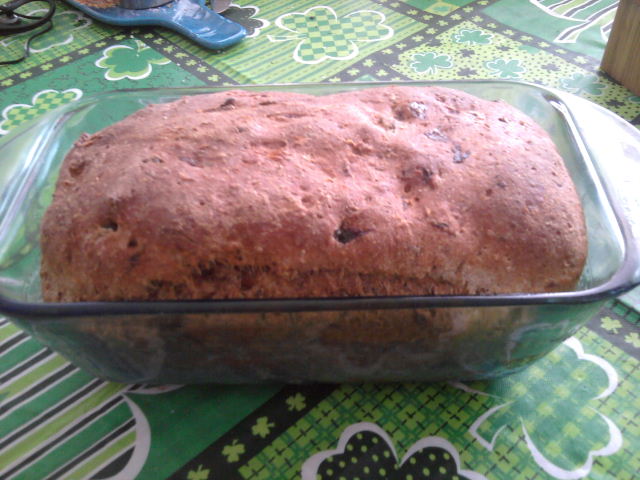
Whole Grain Raisin Bread

What could be better than homemade bread, especially on a cold day? The smell alone conjures good memories and warm feelings. After making this recipe several times, I think I've finally tweaked the ingredients and amounts to produce the perfect loaf of bread. Most people tend to prefer white raisin bread, so this is a healthier twist on familiar comfort food. I've used some specialty flours that you may not have on hand, so I'm providing substitution options just in case. The time involved in this recipe is well worth the final product!


Ingredients
1 1/4 cup raisins
1/4 cup oats
1/2 T yeast
1 T honey
3/4 cup warm water
1 egg
1/3 cup dry milk 
1 t salt
1 t cinnamon
1 cup whole wheat flour
1/6 cup tapioca flour (or wheat)
1/2 cup spelt flour (or wheat or white)
1 1/2 cup white flour
2 T wheat germ (may omit)

Directions
1. Put raisins in a small sauce pan, cover with water, and simmer for about 15 minutes. Stir every now and then (this helps plump up the raisins). When draining raisins, reserve 1/4 cup of the water and add to the oats.
2.  Add the yeast and honey to the warm water and let sit for at least 5 minutes.
3.  In the bowl of a stand mixer, add the egg, dry milk, salt, cinnamon, wheat germ,yeast mixture, and wheat, tapioca, and spelt flours. Using the paddle attachment, mix for about 3 minutes.
4.  Add about half of the raisins and mix until just combined. Add white flour in increments while mixer is running. (You may need a little more or less than what I did depending on the humidity - the dough should be firm but sticky.)
5.  Replace the paddle attachment with the dough hook. Add the remainder of the raisins. Using the dough hook, "knead" the bread for about 6 minutes.
6.  Spray a bowl with non-stick cooking spray. Place dough in bowl and turn to cover dough in spray. Cover with a clean dish towel and let rise in a warm place for about an hour.
7.  Punch dough down and place into a 9 x 5 loaf pan (I use glass) sprayed with non-stick spray. Cover and let rise another 40 minutes.
8.  Bake bread at 350 for 40-45 minutes.

This bread tastes great fresh or will keep well for months in the freezer!

Nutrition (for 1 slice, based on 20 slices per loaf)
Calories: 116
Total Fat:  .7g
Carbs:  25g
Fiber: 2g
Sugar: 6.5g

Protein: 3.2g


 Eat healthy and homemade!

Sunday, December 16, 2012

Skinny Chocolate Chip Cookies

Tis the season for baking and Christmas goodie overload! But, with this recipe, you can indulge a little and not feel quite as guilty.  I cut out a lot of the sugar in this recipe though there is still quite a bit. Some people say you can substitute half the butter called for in a recipe with applesauce. I've tried it a few times - sometimes with success, sometimes not. I wanted to make sure these cookies were good, so I opted to leave the butter in them.  Enjoy!
Ingredients
2 c all-purpose, unbleached flour
1/4 c self-rising flour
1 t baking soda
1/4 t salt
1/2 c unsalted butter
3/4 c brown sugar, packed
1/2 c white sugar
1 t vanilla extract
1 fresh egg white
1/8 c (2 T) liquid egg substitute 
1/2 c semi-sweet chocolate chips

  Directions
Pre-heat oven to 350.  Cream butter and sugar until fluffy.  Combine dry ingredients in a separate bowl, stirring with a whisk.  Add vanilla, milk, and egg whites/substitute to the butter and sugar; mix.  Add dry ingredients to wet slowly. (This dough is a bit thick.) Stir in chocolate chips.  Bake for 8-10 minutes on parchment paper lined cookie sheets. Makes about 3 1/2 dozen cookies.

Nutrition Facts  (for 1 cookie, based on yield of 43 cookies):
Calories: 78
Fat: 3g
Carbs: 13.7g
Sugar: 9g
Protein: .9g

Stay healthy!

Saturday, November 17, 2012

BMI vs. LBM


Most people have heard the term "BMI" which stands for Body Mass Index.  It's a way of measuring your weight in relation to your height the idea being that people who are taller can hold more body weight in a healthy way than those who are shorter.  You can calculate your BMI using a free tool from the Mayo Clinic.  A BMI in the range of 18.5 - 24.9 is considered normal; however, the calculation is inherently flawed.  Why? Well, it doesn't take into account the amount (or lack) of lean muscle or bone mass a person carries. People who are more muscular weigh more, which unfairly increases their BMI.  People who are older have less bone density, which can inaccurately decrease their BMI.  This measure self-admittedly over-estimates body fat for people who are more muscular and under-estimates body fat for older people or those with less muscle mass.  The good part about this measure is you don't need any specialized equipment to calculate your BMI.

Lean Body Mass (LBM)
lean body mass Lean Body Mass (LBM): Definition & Formula 
A  better measure of health is the amount of lean body mass you have.  Determining this will help you figure out how much weight (if any) you need to lose to achieve your desired amount of body fat.   Lean body mass is composed of your organs, blood, bones, muscle, and skin - the rest is fat! 

The first step in determining your lean body mass is to have your body fat calculated.  The most accurate way to do this is through water displacement though most people do not have this available to them; it is also costly and unnecessary for most people.
  
The two most common and accessible ways for people to have their body fat measured is through skin calipers or through bioelectrical impedance.  Most gyms have these tools.  With skin calipers, a trained professional will pinch you at several different places including your bicep, tricep, back, and hip.  Taken together, these results can provide an estimate of body fat percentage.  Bioelectrical impedance tools send a painless electric current through your body and measure how fast it travels.  The more lean body mass a person has the longer it takes for the current to travel through the body.  This can overestimate body fat percentage if a person is overly hydrated as in when preparing for a long distance race.The last time I had my body fat checked with this type of tool, I had it done by 2 different people on 2 different days and the result was the same - 20%. So, in my experience, they are at least reliable.

This chart from the American Council on Exercise shows recommended percentages:

Ideal Body Fat Percentage Chart1 Ideal Body Fat Percentage Chart: How Lean Should You Be? 

This chart couple with your lean body mass can help you decide if you should/need to lose weight.  Calculate your lean body mass: weight - (weight x body fat).  For example, a 150 pound woman with 25% body fat has a lean body mass of 113.5 pounds. 150 - (150 x 25%) = 113.5  In other words, this woman has 37.5 pounds of body fat.  Since women need 13% essential fat, this woman would want to lose no more than 12% of her weight or 18 pounds and even that is extreme.  A more realistic and healthy goal would be to reduce the amount of body fat into the "fitness" range by dropping 1-2% body weight or about 2-3 pounds.  So, really, this woman doesn't really need to lose weight. Pushing yourself into an unhealthy fat percentage range is only going to cause your body undue distress - do your best to maintain 21 - 28% and you'll be fine :-)

Stay fit!

Thursday, October 11, 2012

A week in the training life...

I love talking to people about running, training, and working out in general. Some of those conversations over the past few weeks have prompted me to write about what I do when I train.  This plan isn't going to work for everyone, but since people have asked what I do, here goes!  I settled on this plan with a little bit of advice from a lot of places, personal preferences, and prior experience. It must be working as my pace has improved weekly for all types of runs I do.


Weight Training
Weight training is an extremely important part of any fitness program including when training for races or other athletic events.  No matter what kind of cardio activity you do, it creates some type of muscle imbalance that strength training can improve.  I prefer to split a weight training workout into 2 days working different muscle groups each day (back/ biceps/lower body & chest/shoulders/triceps) while doing abs every day.  I alternate this program daily and switch it entirely after 6-8 weeks.  Doing the same thing over and over will only work for so long - keep your muscles guessing by changing your routine or increasing intensity. 

Contrary to what people think, even when training for a race, you should still do leg exercises. Even though running is a full-body exercise, your leg muscles still become imbalanced depending on the surfaces you run on and the way your feet strike the ground.  Doing single leg exercises is best to help combat this problem (i.e. lunges, single leg squats, step-ups, etc.). 

Cross Training
Though running makes up the bulk of my cardio, it's important to give my muscles a break from that repetitive motion and challenge them in different ways. Cross training for me consists of stair climbing, elliptical, stationary bike, and the occasional aerobics class. 

Running
Since I'm not new to running, I typically run 5 days per week.  This might be too much for a new runner; it also might not be possible during extreme weather.  Fall seems to be a good time for lots of outdoor runs - the treadmill can't even compare.  If you have to run on a treadmill (only do it as a last resort!), set the incline to at least 1% to simulate running outside.  Remember that when you run on a treadmill, you don't move anywhere - the belt does the moving for you.  It's much easier (and a lot more boring) to run on a treadmill.

A week in my training life...
Sunday: 5 mile hill run, weight training
Monday: 7-8 mile hill run, 20-30 min cross training, weights
Tuesday: 5-6 mile flat run, 30-35 min cross, weights
Wednesday: 9 x 400 sprint intervals, 45 min cross, weights   
Thursday: 75 min cross, weights
Friday: 10-14 mile run, sometimes weights
Saturday: REST

No matter how much time you have, any type of physical activity is going to benefit you in the long run.  If you don't have time to run for 45 minutes, run for 25 and run hard!

Stay fit and healthy!

Saturday, October 6, 2012

Pumpkin Peanut Butter Cups (Vegan)

Here's a pretty simple, low calorie recipe to satisfy your sweet tooth! You can use plain old chocolate chips if you don't have carob (also eliminate coconut oil if you use chocolate) and 2 T of peanut butter if you don't have/like pb2.  Why use carob? Compared to chocolate, carob has more calcium, less calories, and much less fat.

Pumpkin Peanut Butter Cups

Ingredients
1 T natural peanut butter
1 T pb2  (+ 1/2 T water)
2 T pumpkin
1/4 c carob chips
1 t coconut oil
splash of vanilla 
carob paste

Directions
Place carob chips in a microwave safe bowl and heat for about 40 seconds; stir and heat for 40 more seconds. Crush the warmed carob into a powder.  Melt 1 t of coconut oil and add to carob; add a splash of vanilla and stir to form a paste. (The carob may be warm enough that simply putting the coconut oil on it will melt it.)  Place about 1/2 tsp of carob mixture into the bottoms of 9-11 candy wrappers and place in freezer to set (you should have about half remaining).


Meanwhile, mix together the peanut butter, pb2, water, and pumpkin.  Once the carob has set, press about 1/2 tsp of peanut butter mixture on top. Add another 1/2 tsp of carob mixture to cover the filling and return to freezer to set. (If you use coconut oil, these are best kept in the fridge.)


Nutrition (per 1 candy, based on a yield of 11):
Calories: 30
Total fat: 1.9 g
Total carbs: 2.8g
Fiber: 0.4g
Protein: 0.8g 

Stay healthy!

Saturday, September 29, 2012

Why you need to run in the rain!


There's no feeling quite like setting out on a run on perfect, crisp morning with the sunshine on your shoulders - nothing but you and the open road.  Unfortunately, not every day brings idyllic conditions for running.  Many people will postpone a run, move to the treadmill, or skip it all together in the face of rain.  I'm no fan of running in the rain, but it's a necessary evil for anyone who plans to run a race.  Not only does it keep you on schedule, but it gives you invaluable experience dealing with  adverse conditions that may reappear on race day.  We all hope race day brings picture perfect weather, but you have to be prepared for anything! If it rains, you've got to be prepared, and the only way to do that is to do a practice run.  The same is true if your race is at a time of year when it could be bitterly cold or hot and humid.  Do your best to get out on at least one run that emulates the extremes of the conditions you may encounter.

When I was training for a marathon, I purposely picked a rainy day to go for a 16 mile run so that I could "practice" in case it rained on race day.  Rain brings more than soaked clothing, and it's important to know how your body reacts.  Everyone is different, but here are some tips that work for me:
  • Wear the best wicking clothing that you have. Not only will it help to keep water off your skin, but should the rain stop, it'll dry faster. Stay away from cotton on these runs!
  • Less is more - wearing extra layers thinking that you'll stay drier by shedding them as you go doesn't work.  All your layers will be wet and just weigh you down even more.  If it's not too cold, a singlet and capris are your best bet.
  • Oddly enough, your eyebrows collect more water than you might expect - wear a hat with a brim to keep the water out of your eyes if you can tolerate it.  It's also going to trap heat from escaping, so this isn't the best option in hot weather. 
  • Wear seamless, wicking socks like these from Under Armour. I love the support they provide while keeping your feet as dry as possible. 
  • Double up on the aquaphor anywhere your feet rub in your shoes - especially if you have unsightly, protruding bunions! Most shoes are made of breathable mesh, so the rain is going to soak your feet quickly.  The extra moisture is going to cause your shoes and socks to rub differently than normal, and the aquaphor will prevent blisters. 
  • Make a rain coat for your iPod or mp3 player with a ziplock baggie.
  • Take the same amount of water you typically would.  Even though you think you may not need or want the water, you need to hydrate during you run.  You're still sweating and losing electrolytes even though it's harder to gauge.
So, while running in the rain may not be the most fun part of training, it's extremely important to experience how your body reacts at least once before the big day.  This way, if the weather is less than stellar, you are prepared to deal with the conditions because you've done it before! Don't let a race you've trained so hard for be ruined by rain!

Stay fit!

Tuesday, September 25, 2012

Easy Homemade Hummus


Here's a recipe that meets the criteria of being both FIT and FRUGAL! When I looked at hummus in the grocery store, I was surprised at how expensive it is. So, I decided to make my own - saving money while only using exactly the ingredients I wanted. Not to mention, it's super easy to make!

While the initial cost of the tahini ($6 for 16 oz) was high, I'll be able to use it for many batches of hummus as well as other recipes.  The amount I used in the recipe costs about 38 cents.You can get chickpeas on sale for 75 cents a can (maybe less), and the small amounts of the other ingredients makes the cost negligible for them.  So, if I add in a few cents for the olive oil, this recipe costs about $1.25 to make (versus $4.50 for one of the leading brand name versions) or about 9 cents a serving. 

Chickpeas are full of fiber, which helps to keep you feeling full longer.  They also have a high amount of protein that, in combination with a healthy fat like olive oil, creates a well-balanced snack. 

This version yields hummus that is less creamy and tangy than store bought, which is how I prefer it. You can always add more lemon juice and some of the juice from the can of chickpeas to make it more creamy.

Homemade Hummus
Ingredients
1 can of chickpeas (garbanzo beans) ~ approximately 1 3/4 cups
1 T extra virgin olive oil
2 T tahini
2-3 cloves of garlic
fresh ground pepper to taste
dash of fresh lemon juice

Directions
Drain and rinse the chickpeas. Put everything into a food processor and blend until smooth!

Nutrition (makes about 14 2-tablespoon servings):
Calories: 58
Fat: 2.5g
Carbs: 7.4g
Fiber: 1.5 g
Protein: 1.9g

Stay fit and save money!